Showing posts with label windows. Show all posts

අද මන් ඔයාලට කියල දෙන්න යන්නේ ෆන් වැඩක් වගේම තව කෙනෙකුට ඇඬෙන්න කරන්න පුළුවන් වැඩක් ගැන. ඇත්තටම මේක virus එකක් virus එකක් කිව්වම කම්පියුටරයට හානිකර වෙන එකක් නෙමෙයි. තාවකාලිව පරිගණකයේ ක්‍රියාවලියට බාධා කරන විදියට තැනුව notepad code වගයක්. 

මුලින්ම කියන්න ඕනේ මේවා ඔයාගේ කම්පියුටරයේ භාවිතා කරන්න නම් එපා... හරි එහෙනම් තරහා කාරයෝ එහෙම ඉන්නවනම් මේවා ඒ අයට දීලා බලන්න.. 

යළුවගෙ Internet නැත්තටම නැතිකරන්න.....මේ Code එක Copy කරල Notepad එකේ .txt වෙනුවට .bat කියල Save කරන්න (name.bat)........
Administrator විදියට open කරන්න....


යළුවගෙ Files නැත්තටම නැතිකරන්න.....මේ Code එක Copy කරල Notepad එකේ .txt වෙනුවට .bat කියල Save කරන්න (name.bat)........
Administrator විදියට open කරන්න....


පිස්සු විදියට අකුරු ටයිප් වෙන්න.. 
මේ Code එක Copy කරල Notepad එකේ .txt වෙනුවට .VBS කියල Save කරන්න (name.bat)........
Administrator විදියට open කරන්න..


එපා වෙනකන් Folders හදන්න...මේ Code එක Copy කරල Notepad එකේ .txt වෙනුවට .VBS කියල Save කරන්න (name.bat)........
Administrator විදියට open කරන්න..


CD rom එක ඇරෙන්නයි වැහෙන්නයි කරන්න..
Notepad එකේ .txt වෙනුවට .VBS කියල Save කරන්න 


i'm anupama dilshan

ඔයාගේ වටිනා අදහස් ගැටළු යටින් comment කරන්න..


සුභ දවසක් හැමෝටම 

ඔන්න අද ගේනවා පොඩි ගැජට් කෑල්ලක්.
මම හිතනවා මේ dock එක හුගක් වැදගත් වෙයි කියල.
මොකද මේකට පහසුවෙන්ම short cut එකතු කරගන්නත් පුළුවන්

ඉතින් අරගෙනම බලන්නකෝ කොහොමද කියල 
පහලින් බාගන්න 


  එහෙනම් මම ගියා.
තවත් මේ වගේ ලිපියකින් හම්බවෙමු.

ඔයාගේ වටිනා අදහස් comment කරන්න අමතක කරන්න එපා.
අනිත් යටත් මේ ගැන දැනගන්න පහලින් share කරන්න.

විශේෂයෙන් මන් අද ඔබට කියාදෙන්න යන දේ වැදගත් වෙන්නේ games play කරන අයට. මොකද RAM එකේ අවශ්‍යතාවය වැඩියෙන්ම තියෙන්නේ ඒ අයට. මොකද සාමන්යෙන් ලැප්ටොප් එකක රැම් ධාරිතාවය pc එකකට වඩා හුඟක් අඩුයි. 

ඉතින් මේකට විසඳුමක් විදියට පෙන් එකක් මාර්ගයෙන් computer එකේ රැම් එක වැඩි කරගන්නේ කොහොමද කියල අපි බලමු.

1. ඔක්කොටම කලින් USB/pendrive එක පරිගණකයට සම්බන්ධ කරන්න. 
2. දැන් desktop එකේ mycomputer right click කරලා properties යන්න. 

**අහ හා ඔහොම ඉන්න ඔක්කොටම කලින් මේ යටින් මගේ channel එකට subscribe පාරක් දාගෙන යන්න.


3. ඊට පස්සේ advanced tap --> performance යන්න. 
4. දැන් advanced click  කරලා virtual memory එකට යන්න.
5. දැන් USB/pendrive icon එක තෝරලා පස්සේ custom size click කරන්න.
6. ඒකට පසුව USB/pendrive එකේ memory available view කරලා පහළට ගිහිල්ලා ok කරන්න. 

දැන් පරිගණකය restart කරලා බලන්න. වැඩේ එළකිරි වගේ වැඩකරයි. යාලුවන්ටත් කියන්න share කරන්න. 

post written by : anupama dilshan

අදත් ඔයාලට කියල දෙන්න යන්නේ හුඟක් වැදගත් වෙන trick එකක්. පෙන් එකක් කියන එක හුදු පෞද්ගලික උපාංගයක්. ඉතින් පෞද්ගල්ක දේවල් අනිත් අයට බලන්න බැරි වෙන්න ඒ කිව්වේ පෙන් එකට පාස්වර්ඩ් එකක් දාන විදිය තමයි කියල දෙන්න යන්නේ. මේකට කිසිම මෘදුකාංගයක් ඕන වෙන්නේ නෑ. os එකෙන්ම ඒ පහසුකම ඇවිල්ලා තියෙනවා. එහෙනම් කරලා බලන්න.. 

BitLocker Software
  • මුලින්ම පෙන් එක pc එකට ගහන්න..
  • දැන් මේ විදියට right click කරලා  Turn on Bitlocker යන්න.
1


  • දැන් Use password to protect the drive ක්ලික් කරන්න.

  • දැන් password fields 2ම අවශ්‍ය පාස්වර්ඩ් එක ගහන්න.

2


  • දැන් මේ යට එන විදියේ වගේ window එකක් එවි. එකෙන් වෙන දේ අනුව කැමති එකක් තෝරාගන්න.
3


  • දැන් ඔක්කොම හරි encryption process එක ආරම්භ වේවි. මේක වෙලා ඉවර උනාට පස්සේ පෙන් එක lock වෙයි පාස්වර්ඩ් එක ගහලා පාවිච්චි කරන්න පුළුවන් විදියට.
4

post written by anupama 
ඔබේ පරිගනකය රහසිගතව සම්බන්ධ වී සිටින්නේ කුමකටද යන්න පරික්ෂා කර බලන ආකාරය.

netstat විධානය භාවිතා කරමින් අපිට පහසුවෙන්ම මෙය කරගන්න පුළුවන්. මෙම ක්‍රමය windows 7, vista, සහ xp මෙහෙයුම් පද්දති වල සාර්ථකව ක්‍රියාත්මකව වෙනවා. 

මෙමගින් අපිට හැකියාව තිබෙනවා යම් කිසි විශේෂිත කාලයක් තුල පරිගනකය සම්බන්ධ වී සිටින්නේ කුමන වෙබ් අඩවි වලටද සහ අන්තර්ජාලය භාවිතා කරන්නේ කුමන මෘදුකාංගද යන්න ඇතුළු ලැයිස්තුවක් සකස් කරගැනීමට. මෙම විධානය භාවිතා කිරීම සඳහා ඔබ command prompt එක administrator අවසරය ඇතුව run කල යුතු වෙනවා. start menu එක විවුර්ත කොට search box හී "cmd.exe" යනුවෙන් type කර search result එක පැමිණිය පසුව ඒ මත right-click කර "run as administrator" යන්න තෝරන්න. 


command prompt වින්ඩෝ එක පැමිණිය පසුව පහත තිබෙන විධානය ඒ ආකාරයෙන්ම type කර enter ඔබන්න. 

netstat -abf 5 > activity.txt
දැන් එම විධානය ඇතුලත් කර enter කල පසුව විනාඩි දෙකක පමණ කාලයක් සිටින්න මොකද එම කාලය තුල පරිගනකය අන්තර්ජාලය හා සම්බන්ධ වී තිබෙන සියලුම සම්බන්ධ තාවයන් පටිගත කරනවා. විනාඩි දෙකක පමණ කාලයක් ගත වී ගිය පසුව Ctrl+C එක වර එබීමෙන් පටිගත වීම නවත්වන්න. 

දැන් ඔබ සියලු දත්තයන් පටිගත කරගෙන ඉවරයි. එම ප්‍රතිපලය දැකගැනීම සඳහා command prompt එකේම activity.txt යනුවෙන් type කර enter ඔබන්න. දැන් විවුර්ත වූ text file එකේ සියලුම විස්තරයන් අන්තර්ගත වී තිබෙනවා ඔබට පෙනෙනවා ඇති. 

විනාඩි 2ක කාලය තුල අන්තර්ජාලය හා සම්බන්ධ තාවය පැවැත්වූ වෙබ් බ්‍රව්සරයද ඇතුලත්ව සියලුම මෘදුකාංග වල ලැයිස්තුවක් ඔබට එහි දැකගන්න පුළුවන්. ඒ අතර ඔබට හුරු පුරුදු නොමැති වෙබ් අඩවියක ලිපිනයක් තිබෙනවානම් google හී පරික්ෂා කර බලන්න. එම වෙබ් අඩවිය අහිතකර එකක් යැයි ඔබ සිතනවානම් එයින් වැළකීම සඳහා විසඳුම google හී පරික්ෂා කර බැලීමෙන්ම සොයා ගන්න පුළුවන්. 


ඉහත සඳහන් කල පරිදි malware, spyware සහ adware වගේ වෛරසද අන්තර්ජාලය භාවිතා කරනවා වෙන්න පුළුවන්. එවැනි සැකකටයුතු ක්‍රියාකාරීත්වයක් ඔබ දුටුවොත් දැනගන්න එය වෛරස බලපෑමක් බව. ඒ සඳහා විසඳුමක් වශයෙන් හොඳ ප්‍රතිවෛරස මෘදුකාංගය ස්තාපිත කරගන්නට පුළුවන්. නැතිනම් පරිගනකය සම්පූර්ණයෙන් ෆොර්මැට් කර අලුතෙන්  මෙහෙයුම් පද්දතිය පිහිටුවා ඒ සමගම ප්‍රතිවෛරස මෘදුකාංගයක්ද අලුතෙන් ස්ථාපිත කරගන්න.
CurrPorts භාවිතයෙන් පහසුවෙන්ම මෙය කරගැනීම. 


ඉහත ක්‍රමය නම් තරමක්  සංකීර්ණ manual ක්‍රමයක්. නමුත් CuurPorts කියන මෘදුකාගයෙන් පහසුවෙන්ම මෙය කරගන්න පුළුවන්. එය නොමිලේම ලබා ගන්න පුළුවන් portable මෘදුකාංගයක්. එම නිසා install කිරීමට අවශ්‍ය වෙන්නේ නැහැ. මේ පිළිබඳව වැඩි වශයෙන් විස්තර කරන්න අවශ්‍ය වෙන්නේ නැහැ මොකද මේ මගින් මෙය කරගැනීම ඉතාමත්ම පහසුයි. එම මෘදුකාංගය පහතින් බාගන්න. 


යාලුවටගේමක් දෙන්න නියම භාණ්ඩේ..... 
වැඩිදෙයක් කරන්න නැහැ කරන්න තියෙන්නේ මෙච්චරයි මම පොඩි auto run file දෙකක් දෙනවා.ඒක පෙන් එකක්ට දාලා ඔයාගෙ යාලුවගේ කම්පියුටර් එකට හෝ වෙනත් එකකට සම්බන්ධ කරලා auto run file එක run කරන්නවන්නයි තියෙන්නේ.

පොඩි වීඩියෝ එකකුත් හැදුවා .මේක බලලම තේරුම් ගනිල්ලා 


ඊට පස්සේ  නොට්පෑඩ් ෆයිල් ටිකක් තියෙවි ඒවා Open කරලා බලන්න.
 Auto Run File Download
මෙතනින් 
වැඩිහරි ගියා නම් කමෙන්ට් එකකුත් කොටාගෙන පලයල්ලා 


InShortViral: How to unlock your computer with the help of your android smartphone, you will need a Rohos Logon Key software installed both on your Android and Computer to gain access you computer.

There is numerous article on the internet concerning how to secure your PC while you are not at the computer, Some of use even try to search that is there any procedure to unlock your PC with the help of the smartphone? But let’I tell you there is an easy method out there by which you can easily Unlock your computer with the help of your Android smartphone.

How To Unlock Windows Computer from Android/iPhone

With this method you need your smartphone to unlock your computer after logging in into your windows login screen and for that you have to connect your smartphone with your PC to identify the right authentication to PC to unlock it. So read out the below steps proceed.
It is possible to access your computer without the login screen. And the process I am going to share today might be the coolest one because it was a two-step authentication process in which some extra security divisions are coming forward to preserve your computer. And the big part is that it was an easy process.

Steps To Unlock Window Computer from Smartphone:

You need a Software Named Rohos Logon Key installed in you computer as well as Smartphone to unlock your computer with the help of Smartphone. Let me tell you Rohos was the third-party tool but it was safe as many professionals trying this software to unlock computer with the help of their smartphone. So here is the process.
1. First of you need to download the Rohos Logon Key Software in your device which you want to pair out with smartphone.


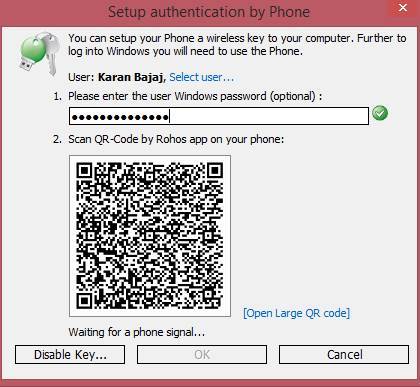
3. Now there click on Options there and set the settings as shown on the screenshot below.
4. After selecting all the options click on ok.

5. Now select the setup a key there and the select the QR code method to verify your key there.
6. Now download the mobile app from the above link and scan the QR code from that app displaying on the screen and your mobile will detect your PC.

7. Thats it you are done now your pc is authenticated with your smart device and every time after unlocking from windows screen you will need your smart device to unlock the second authentication process.
So above we have discussed about Unlock Window Computer from Android/iPhone Smartphone, this is a very cool way to secure your computer as if someone get to know your login password you computer will not get open until it get the security key that is your smartphone that will be always with you. Hope you like our work, do share our cool stuff with others too. leave a comment below if you have any related queries.


Here is a way to How To Increase RAM Using USB/Pendrive.


Iknow it’s old trick but still some people aware of it that’s why i’m sharing it with you all. As you all know what is basic functionality of RAM in your PC/Laptop as the more RAM means more speed and faster your system’s speed.
For gaming purpose one need more RAM. What if you don’t have enough money to buy new RAM and aslo sometimes there is no extra slot on your motherboard to setup new RAM also somtimes motherboard do not more RAM that you need so, then how will you upgrade you PC/Laptop’s RAM ?You need to buy a new PC/Laptop ? Well the answer is no, Today, We will share some tips regardingHow to Increase RAM Using Pendrive in Windows.

How To Increase RAM Using USB Pendrive

Steps to Increase RAM Using USB Pendrive:

  1. First of all connect your USB/pendrive into your PC/Laptop’s USB port.
  2. Now in the desktop just right click on the My Computer icon and then click on theProperties.
  3. After this you will have to click on Advanced Tab then click on Performance.
  4. Now click on Advanced and then click on Virtual Memory.
  5. Now select you pendrive/USB icon and then click on Custom size.
  6. After that you have to view the memory available in your Pendrive/USB and note it down and click on OK.
  7. Restart you Laptop/PC and Enjoy the fast speed of your system :)
That’s it you have successfully increased the RAM of you system using USB/Pendrive. If you like this post share it with your friends ! 
:)


SB Device Not Recognized Eroor Fix_Techviral
Time to resolve the issue of USB Device Not Recognized Error In Windows in few steps
Many time you notice the error USB Device nor recognized while working on windows. This is a very irritating one that can come by different reasons and with this you are unable to use the drive in your computer as it is not explore able when this error is generated in windows. And this error is mainly driver error that generally occur due to malfunctioning or corrupting of USB drivers in PC. But you don’t exactly know which driver needs to be changed. But in this tutorial will be discussing on the same by which you can easily sort out this problem in your windows PC. So have a look on complete guide discussed below to proceed.

How To Solve USB Device Not Recognized Error In Windows

The method is very simple and you will be updating the driver that is corrupted at that time and with that the issue will get resolve and you can easily access the USB device in your computer. Just follow up the below steps to proceed.

Steps To Solve USB Device Not Recognized Error:

  1. First of all open RUN (Windows Logo + R) and then type “devmgmt.msc” there and  and click ok.
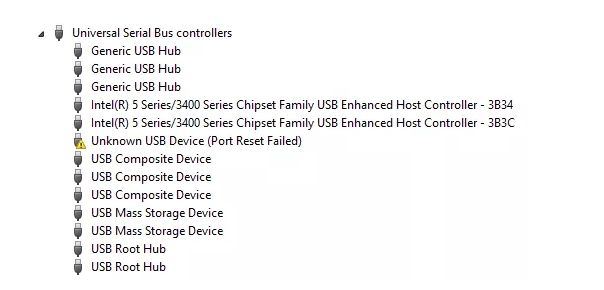
  2. Now double click on Universal Serial Bus controllers to expand it.
  3. Now insert Your USB pendrive in it and all the driver list will get refreshed.
  4. Now you will see error sign on the Serial Bus Controller which creating this error,
  5. Simply right click on it and then uninstall it and after that reinstall it and you can also update other drivers too that not working properly in your device.
  6. Thats it you are done, now you simply need to restart your computer and then after it insert the USB driver in any com port and you will not receiving this error message this time.
 So above is all about How To Solve USB Device Not Recognized Error In Windows. With this you can easily fix out the USB device not recognized error that occurs while you insert USB drive in your windows PC. Hope you like this cool solution, do share with others too. Leave a comment below if you have any related queries with this.

Record Animated Screenshots In Windows Techviral
Capture out the live screen shots in windows with GIF Screenshot Taking trick discussed right here
There are lots of tools available today for screen recording and screen capturing that records the live screen display but all these apps generate a very bulk sized files of screen recordings. And this can pay a load on your computer storage, so here we have alternative for it that is capturing the screenshots in the form of animated GIF and with that you can see the live effects of the things performing on your windows PC. And this can be done very easily with the app that we will be discussing here. So follow up the complete guide discussed below to proceed.

How To Capture Animated GIF Screenshots In Windows PC

This method depends on a some of the best tools by which you can combine up two screenshots and that will be making animated GIF screenshot and will be of very lesser size that the other apps creates. So have a look on these tools discussed below.

#1 Gyazo

This is one of the best tool that will allow you to capture the screen in gif format and that will save your lots of memory than the live screen capturing. An dalso using this tool you can easily capture the screen of particular rectangular area. Follow the below steps to use this tool.
  1. First of all download and install Gyazo tool in your windows PC.
  2. Now after installing app click on the icon in the taskbar.
  3. Now there you have to select Capture gif or you can also use shortcut keys for this that is ctrl+shift+g.
  4. Now a rectangular box will appear in which you have to select the area that you want to record, simply set it according to your wish.Gyazo screen recording Techviral
  5. Thats it you are done, now the capturing will start and when the screenshot is captured it will automatically upload it in their server and will give you the link of your animated gif that you can easily use anywhere.

#2 ScreenToGIF

This is the another best tool having similar working like above tool. This tool allows you to record a selected area of your screen and save it as a Gif. And using this tool you can easily record your screen and save directly to a gif looped animation and also pause and continue to record and lots of things that you will get to know after using this tool in your PC.ScreenToGif Techviral

Download:- ScreenToGif for Windows

So above is all about How To Capture Animated GIF Screenshots In Windows. With this method you can easily make you desired animated GIF in your windows by just using the above tools. And you can solve someone technical problems of android with this GIF animation by step by step display. Hope you like this cool method, keep on sharing with others. Leave a comment below if you have any related queries with this.


Welcome

Welcome

Categories

Blog Archive

Powered by Blogger.